
Maksim Kabakou - Fotolia
Use Pulumi and Azure DevOps to deploy infrastructure as code
Follow this tutorial for an overview of Pulumi, an IaC tool, within the Azure DevOps toolchain, and how to use them together to define, build, test and deploy infrastructure.

Infrastructure as code makes IT operations part of the software development team, with scalable and testable infrastructure configurations. To reap the benefits, IaC tools integrate with other DevOps offerings, as in this tutorial for Pulumi with Microsoft Azure DevOps.
Pulumi provides infrastructure as code provisioning, while Azure DevOps provides version control and a build and release tool. Together, they form a pipeline to define, build, test and deploy infrastructure, and to share infrastructure configurations. Follow this tutorial to develop infrastructure code in C# with Pulumi, unit test it using the open source NUnit framework, and safely deliver it via the Azure DevOps ecosystem. First, get to know Pulumi.
Pulumi basics and prerequisites
The Pulumi approach puts infrastructure into common development programming languages, rather than a domain specific language (DSL) only used for the tool. This means that an infrastructure blueprint for a project can use .NET Core, Python or another supported language that matches the application code. HashiCorp Terraform uses the HashiCorp Configuration Language or JSON or YAML formatting to define infrastructure as code. Similarly, Azure Resource Manager has limitations on how a user can apply logic and test it.
Note: In July 2020, HashiCorp added the ability to define infrastructure using TypeScript and Python as a feature in preview.
Because Pulumi uses a real programming language for infrastructure code, the same set of tools can build, test and deploy applications and infrastructure. It has built-in tools to assist IT engineers as they develop, test and deploy infrastructure. Pulumi is designed to deploy to cloud providers, including AWS and Azure.
To follow this Pulumi tutorial, get to know these terms:
- Project: The project contains the configuration code for infrastructure. It comprises a yaml configuration file, and source code for how the infrastructure should deploy.
- Stack: These are the instances of the Project. The configuration files for the Stack reside in <stack>.yaml.
This tutorial starts with one of Pulumi's example apps for building a website. To highlight the integration with Azure DevOps, we make some modifications to the example app repository:
- Split the Pulumi code and tests into separate projects.
- Use a compiled C#-based Pulumi Project artifact (.dll) for infrastructure provisioning.
See the AzDOPulumiExample repository in Azure DevOps, and its ReadMe file for the modifications made to the example app.
Azure DevOps basics and prerequisites
Microsoft provides Azure DevOps, but is not tied to one language, platform or cloud. It includes many DevOps orchestration services, such as Azure Boards to track a software project and Pipelines to build, test and share code.
This tutorial uses repositories and Azure Pipelines to automatically build, test and release code. Azure Pipelines is a cloud service. It supports pipeline as code, because the user can store the pipeline definition in version control. Within Azure Pipelines, this tutorial relies on a pipeline, which describes the entire CI/CD process with definitions comprised of steps in jobs divided into stages.
- A stage is one or more jobs for a logical phase of the CI/CD process. Admins can create stages for build, test and release, for example.
- Jobs are the units of work that get assigned to an agent. A job is a list of sequential steps to perform on an agent. The deployment job is a special set of steps run against the environment to deploy.
- Steps are the atomic unit of work. A step can be a task, script or reference to a template.
- The environment is a collection of resources, such as VMs, that the deployment targets.
The IT organization controls Azure Pipelines through both manual and programmatic means.
- Approvals are a way for the engineer to decide whether or not a stage executes.
- Triggers are various kinds of events that can initiate a pipeline execution. Some examples include a branch push, pull request or a scheduled event.
- Variables are reusable values that work in the stage, jobs or steps in a pipeline definition.
- Templates enable IaC programmers to practice the DRY -- don't repeat yourself -- coding principle. Templates can define reusable content, logic and parameters.
- Azure DevOps supports various kinds of artifacts to publish and consume different types of packages with Pipelines.
Set up the project and pipeline
To get started with the Pulumi example in this tutorial, create a sample Pulumi stack along with some unit tests. There is a sample repository with source code for the project called WebServerStack, as seen in Figure 1. Start by cloning this example repository locally.

Once the repository is cloned, you can build and test the project locally by using dotnet build and dotnet test commands, respectively.
To set up Azure DevOps, start with an Azure DevOps organization with repository and pipeline enabled. For this tutorial, I created an Azure DevOps organization named dexterposh. In the figures, you see this organization called AzDO, for Azure DevOps.
Under the AzDO organization, create a repository named AzDOPulumiExample for the Pulumi code and tests project. Create an Azure Resource Manager service connection to connect to an Azure subscription.
Next, create an environment named dev and add manual approval so that the engineer controls what deploys. Without manual approvals, Azure DevOps will automatically create and deploy to the environment. Environments can only be created via the Azure DevOps portal.
Finally, install the Pulumi extension in your Azure DevOps organization.
Integrate Pulumi Project within Azure DevOps
This integration with Azure DevOps enables us to make build and release stages for the Pulumi Project. We can also extend the pipeline to provision changes to the environment. Stages are logical divisions meant to mimic different phases in an application's lifecycle.
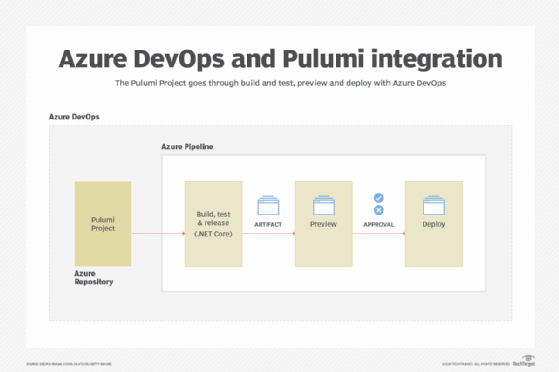
In the stage titled Build, Test & Release, Azure DevOps will build the project, run tests and then package and publish an artifact. The Preview Stage lets the engineer or project team preview the changes to the infrastructure. Finally, in the Deploy stage, we can approve the changes and make them go live in the environment to provision infrastructure.
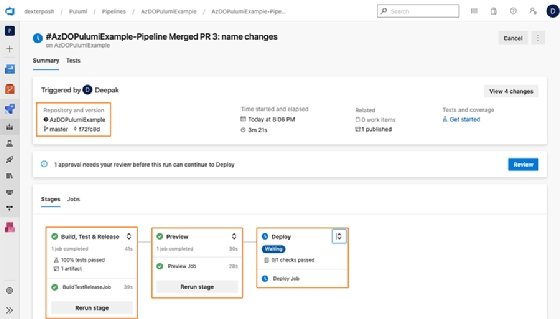
A high-level overview of these stages is diagrammed in Figure 2, and the final integration is shown in Figure 3.

Build, Test & Release stage
In Azure DevOps, create a stage called Build, Test & Release. Add the file named azure-pipelines.yml at the root of our repository, which the AzDO organization picks up by default as the pipeline definition.
Editor's note: Both .yaml and .yml are YAML file extensions.
At the top of the pipeline definition in azure-pipelines.yml, we define several things.
- A friendly name for the pipeline.
- The trigger that determines how the pipeline run initiates in Azure DevOps. In this case, the trigger is changes merged to the master branch, as well as pull requests raised to merge to master.
- This tutorial uses the pulumi_var_group variable groups to store the Pulumi access token. Also, we define some variables, such as pulumiProject and pulumiStack, used in the pipeline later.
- Stages define a stages list, and add a stage for Build_Test_Release.
stages:
  - stage: Build_Test_Release
    displayName: Build, Test & Release
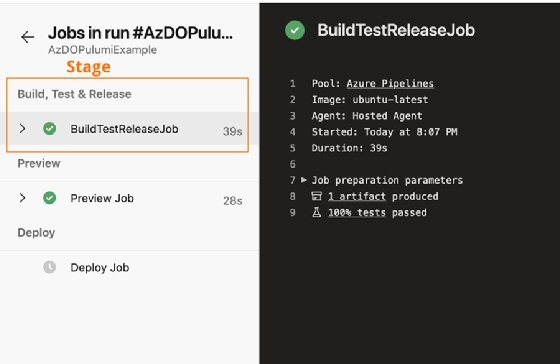
After defining a stage, execute it on an agent with a job. The job will execute all the steps. The details of the BuildTestReleaseJob are shown in Figure 5.
In this set of commands, $(vmImage) refers to the variable that we define later in the YAML file.
stages:
  - stage: Build_Test_Release
    displayName: Build, Test & Release
    jobs:
    - job: BuildTestReleaseJob
      pool:
        vmImage: $(vmImage)
To build a .NET app, we fetch the dependencies it references. The agent where the code will be built is new and does not have this information yet. For all the .NET Core-based tasks here, we use the official .NET Core CLI task, available by default. Add the task, shown as DotNetCoreCLI@2, to restore the project dependencies.
stages:
  - stage: Build_Test_Release
    displayName: Build, Test & Release
    jobs:
    - job: BuildTestReleaseJob
      pool:
        vmImage: $(vmImage)
      steps:
      - task: DotNetCoreCLI@2
        displayName: dotnet restore
        inputs:
          command: 'restore'
          projects: $(pulumiProject)
          feedsToUse: 'select'
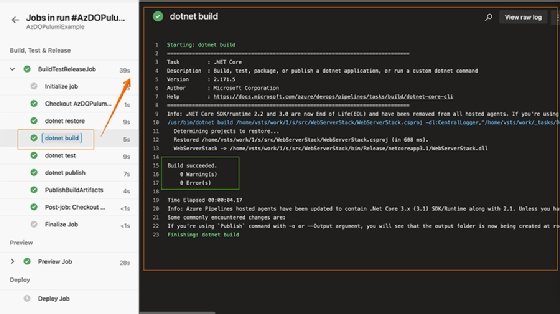
The next step in the infrastructure code's lifecycle is to build it. The build step ensures that the Pulumi code, along with all the dependencies, can be compiled into the .NET framework's Intermediate language files with a .dll extension and a binary file. The .NET Core CLI task works here as well.
      - task: DotNetCoreCLI@2
        displayName: dotnet build
        inputs:
          command: 'build'
          projects: $(pulumiProject)
          arguments: '--nologo -c Release'
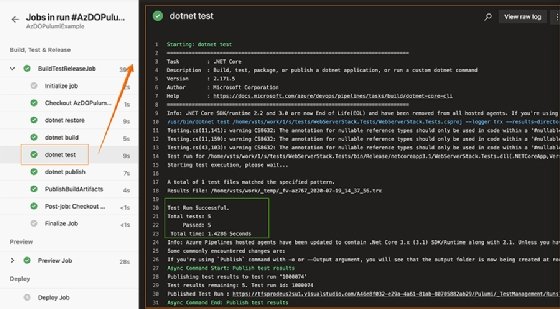
A successful build confirms that dependencies are pulled in successfully, there are no syntactical errors, and the .dll file was generated. Then, run tests to ensure that there are no breaking changes. Use the .NET CLI task for this step.
- task: DotNetCoreCLI@2
        displayName: dotnet test
        inputs:
          command: 'test'
          projects: $(pulumiTestProject)
          arguments: '--nologo -c Release'

Run the task dotnet publish against the .NET app to generate an artifact. The artifact is what later stages will use. Once published, the .NET app and all the dependencies are available in the publish folder, which we can archive as a zip file for later use.
Look at the argument specified to place the output to the $(Build.ArtifactStagingDirectory) variable, which represents a folder path on the agent to place build artifacts.
- task: DotNetCoreCLI@2
        displayName: dotnet publish
        inputs:
          command: publish
          publishWebProjects: True
          arguments: '--configuration $(BuildConfiguration) --output $(Build.ArtifactStagingDirectory)'
          zipAfterPublish: True
With the artifact ready, archive it and publish it as a build artifact. Azure Pipelines performs this step with the task named PublishBuildArtifacts. Specify the variable $(Build.ArtifactStagingDirectory) as the path to the zip file and the published build artifact is named 'pulumi.'
# this code takes all the files in $(Build.ArtifactStagingDirectory) and uploads them as an artifact of your build.
      - task: PublishBuildArtifacts@1
        inputs:
          pathtoPublish: '$(Build.ArtifactStagingDirectory)'
          artifactName: 'pulumi'
In this Pipeline stage, we built, tested and released the infrastructure as code from Pulumi with multiple tasks under the BuildTestRelease job. The next stage utilizes Pulumi tooling to generate a preview and then finally deploy the project.
Preview stage
With infrastructure code, we can extend the pipeline to generate a preview. The Preview stage is similar to a Terraform execution plan, which describes how it will get to the desired state. The Preview stage assists the engineer in reviewing the effect of changes when they deploy to an environment.
A YAML-based definition for the Preview stage, shown below, is added to the stages list in the pipeline definition.
- stage: Preview
    jobs:
    - job: PreviewJob
      displayName: Preview Job
      pool:
        vmImage: $(vmImage)
      steps:
      - template: ./build/downloadArtifact.yml
        parameters:
          downloadPath: $(System.ArtifactsDirectory)
          dropName: 'pulumi'
      - template: ./build/configurePulumi.yml
        parameters:
          pulumiCwd: '$(System.ArtifactsDirectory)/pulumi'
          pulumiStack: $(pulumiStack)
          pulumiPlugin: 'azure v3.12.1'
      - task: Pulumi@1
        displayName: pulumi preview
        inputs:
          cwd: '$(System.ArtifactsDirectory)/pulumi'
          azureSubscription: $(azServiceConnection)
          command: 'preview'
          stack: $(pulumiStack)
          createStack: true
The stage contains a job, PreviewJob. Let's review what each step inside the job does.
1. Template reference to build/downloadArtifact.yml. It contains another two tasks: to download the build artifact from the previous stage and to extract the zip file from the artifact. Here, it downloads the pulumi named artifact and makes it available in the path $(System.ArtifactsDirectory).
2. Template reference to build/configurePulumi.yml. It contains another two tasks: one to run the configure command and another to install the Azure extension to use with Pulumi. A plugin was added as a workaround to install Pulumi and the Azure extension required.
Note: We created separate template YAML files, called downloadArtifact.yml and configurePulumi.yml, to avoid issues when these steps repeat again in the Deploy phase. The configurePulumi.yml steps template was needed as a workaround for the Pulumi task that failed on AzureDevOps, with an error message asking to install the Azure plugin on the agent. Pulumi shares that the error relates to a limitation when using binary mode with plugin discovery.
3. Finally, a task runs the Pulumi preview command to generate a preview of the changes to be deployed to the infrastructure.

Deploy stage
The Deploy stage is the last part of this DevOps pipeline. It uses the Azure DevOps environment and manual approvals.
The setup defines the stage with a job and multiple steps within the job:
  - stage: Deploy
    jobs:
    - deployment: DeployJob
      displayName: Deploy Job
      pool:
        vmImage: $(vmImage)
      # creates an equivalent pulumi stack AzDO environment if it doesn't exist
      environment: $(envName)
      strategy:
        # default deployment strategy
        runOnce:
          deploy:
            steps:
              - template: ./build/downloadArtifact.yml
                parameters:
                  downloadPath: $(System.ArtifactsDirectory)
                  dropName: 'pulumi'
              - template: ./build/configurePulumi.yml
                parameters:
                  pulumiCwd: '$(System.ArtifactsDirectory)/pulumi'
                  pulumiStack: $(pulumiStack)
                  pulumiPlugin: 'azure v3.12.1'
              - task: Pulumi@1
                displayName: pulumi update
                condition: and(succeeded(), eq(variables['Build.SourceBranch'], 'refs/heads/master'))
                inputs:
                  cwd: '$(System.ArtifactsDirectory)/pulumi'
                  azureSubscription: $(azServiceConnection)
                  command: 'up'
                  stack: $(pulumiStack)
                  args: '--yes'
This stage relies on the DeployJob job. Here's what each step inside the job does:
- Template reference to build/downloadArtifact.yml, which is the same as explained in the Preview stage.
- Template reference to build/configurePulumi.yml. Again, this step is the same as explained in the Preview stage.
- The final task runs the command to generate a preview of the changes to be deployed to the infrastructure. Team members can look at the Preview stage to determine the impact of the change being pushed, and approve it when satisfied, as shown in Figure 8.
Once approved, the previewed changes are deployed, as shown in Figure 9.
After following this tutorial, DevOps teams can assess the benefits of combining Pulumi and Azure DevOps for infrastructure as code. With a common programming language rather than a DSL, infrastructure code matches application code. These programming languages are in use globally with several years of maturity in terms of how to test, build and package code. The combination of Pulumi with the Azure DevOps services creates a CI/CD pipeline for that infrastructure code. It can also extend to change management, with preview capabilities and manual approvals as needed before code deploys to an environment.