Perform this Octopus Deploy tutorial in under 60 minutes
Octopus Deploy extends a variety of agents called Tentacles that manage a wide swath of tasks. In just one hour, create an Octopus Deploy instance in a simple home lab.
With today's always-on, always-mobile expectations of every application, it's harder to maintain software deployments and version control at scale to the enterprise.
IT ops and DevOps professionals constantly search for tools that ease that task, testing them out in a home lab. This Octopus Deploy tutorial walks through how to install and use the tool for such a trial run.
Octopus Deploy applies automation to release management, whether the release goes into dev, test or production IT setups. It gives teams, particularly cross-functional DevOps teams, control over access and segmentation. It also maintains a consistent deployment process for an application or database. Once the user sets up a deployment, anyone should be able to continuously deploy new versions of the software to a given environment throughout the deployment lifecycle. Octopus Deploy boasts that a user can successfully launch the tool within an hour, no consultants necessary. To put its claims to the test, I did an install and basic configuration in a home lab, all on the clock, only stopping it to take notes and screenshots for the tutorial. This trial run includes a few options for deployment and automation.
Install Octopus Deploy
This Octopus Deploy tutorial is based on a home lab setup, with all of the machines on Microsoft Hyper-V VMs. Octopus Deploy calls each organizational unit of machines an Environment, which are delineated as Development, Test, Production or another target deployment location. In the Environment for this tutorial, Microsoft Windows Server 2016 is set up, and a desktop, running Windows 10, will host Git and Microsoft Visual Studio Code (VS Code).
Octopus Deploy has a built-in repository, and users can create their own packaged applications for anything not in the default repository.
Start the clock -- it's time to dive in.
To install Octopus Deploy, obtain a license key. The test lab does not have an internet connection, so I relied on Octopus Deploy's offline activation site for the license XML and 45-day free trial.
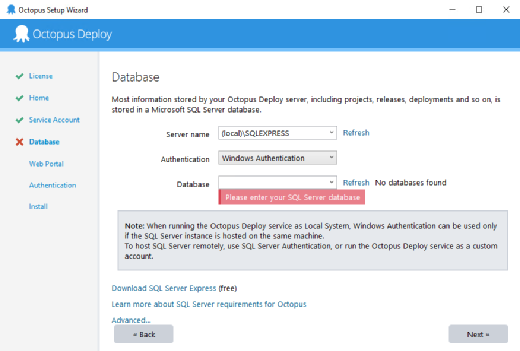
After activating the license, go through the default steps to set up the program file directory for the Octopus Deploy server, select a service account for use, and download and install SQL Server 2017 Express, since Octopus Deploy needs a database for installation. Once installed, update the database configuration to point at the local install of SQL Server Express. This step came with some confusion because, at the database creation step, I couldn't hit Next since it was asking me to connect to a local database (see Figure 1).
Figure 1. Octopus Deploy requests a database during setup.
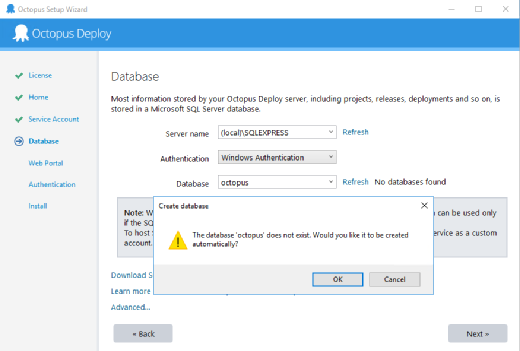
I tried to create a database via SQL Server Express but, at one point, decided to just fill in the prompt with a name to get past it. At this point, the installer asked if I would like it to make the database for me (see Figure 2).
Figure 2. Octopus Deploy offers to create a database during install.
This step also took longer than expected because the SQL Server Express installation moved slowly, which I can't blame Octopus Deploy for. At this point, we are 20 minutes into the promised 60 for installation of the server from the ground up.
Next, configure the Octopus web portal by specifying the port and directory the portal lives on. I chose a standard port 80 and / root directory. After that, I chose Active Directory (AD) for authentication, since I didn't want to have to manage separate accounts from those already in the test lab.
Octopus Deploy was relatively simple to install, despite the one hiccup, especially given that it is a complex tool. Now, generate a deployment by navigating to the web portal at http://localhost:80.
Manage deployments
Once Octopus Deploy installs, get started on software deployments.
Launch the web portal, and enter a username and password. Because this installation uses AD for authentication, it can't run with just the account name. For the AD authentication type, specify Domain\Username and then the password. Additionally, you can simply click Sign in with a domain account, and it will pick up the credentials used when you logged in to Windows.
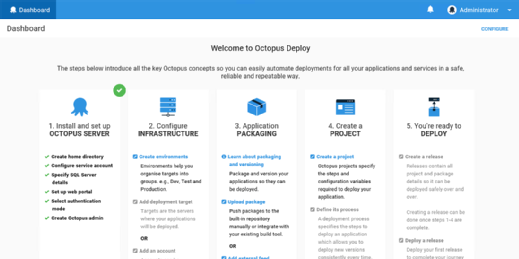
Octopus Deploy offers a simple left-to-right workflow for the remainder of the steps to create a deployment for an Environment (see Figure 3).
Figure 3. The Octopus Deploy administrator dashboard has a left-to-right design.
This would have been handy, but my administrator account did not have permissions to start on the next step, which is to create a new Environment. I could log in and view the Getting Started guide from any account on my domain, even though I couldn't perform any actions.
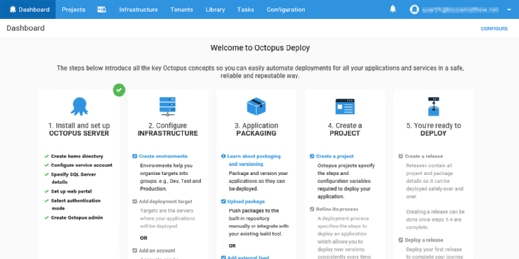
I decided to make another Octopus Deploy instance and, this time, specified a different AD user than Administrator to be the admin in the Octopus Deploy Environment. Since the SQL server was set up and since I knew the trick to getting past the database name prompt, this took no time at all.
Figure 4. This second instance of Octopus Deploy runs with User01 rather than Admin.
This change yielded a fully fleshed-out dashboard, and I could also see that my user's email address enabled the login in the top right corner. I'm not sure if Octopus Deploy has something against default administrator accounts, but in a test lab, this idiosyncrasy can throw a user for a loop, since I didn't select an AD account the first time.
Octopus Deploy did live up to the promised sub-60-minute setup, and it went smoothly.
It was a breeze to create an Environment. Add the name of the target group; since I want to install VS Code and Git, I named this group Developers.
Add the deployment target next. For this Octopus Deploy tutorial's deployment, I want to use a Listening Tentacle, which is a lightweight agent, since I find server/client installations to be reliable, rather than trying to use Secure Shell or poll with AD. Install the Tentacle on a VM in Hyper-V, then configure the Octopus Deploy deployment by clicking on Add Deployment Target from the Environment menu.
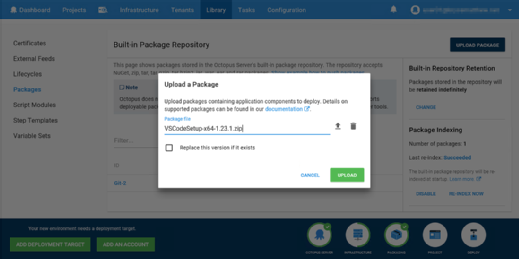
Next, create packages, which include the components for the application to deploy. This Octopus Deploy tutorial focuses on Git and VS Code installs, so I zipped up the installers and then uploaded them to the repository.
Figure 5. Upload packages to repository to prepare for a software deployment.
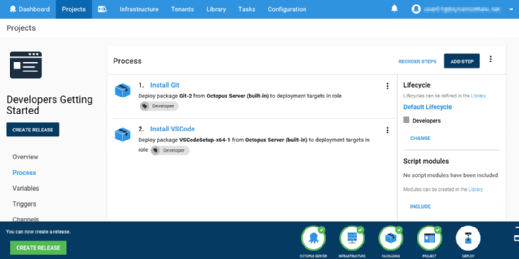
This package gets delivered and installed on the developers' machines. Since we're installing Git and VS Code, I selected the Deploy Package process and configured them to deploy the appropriate software for each.
Figure 6. Process steps to install Git and VS Code
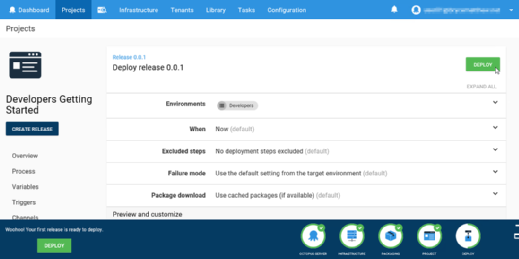
The final step in this Octopus Deploy tutorial creates a release for the deployment. Similar to a software release, this step versions the deployment so the users can see its history. This release gets the version name 0.0.1 and is ready to deploy. A success message confirms the release made it.
Figure 7. Release 0.0.1 Deploy
Total time spent to create release of software to my development lab was 58 minutes. Octopus Deploy did live up to the promised sub-60-minute setup, and it went smoothly.
Octopus Deploy benefits
I see value in the ability to version deployments. In the process, it's evident that grouping and provisioning are a robust system. You can create groups and roles easily and assign computers to each.
Grouping employees in the company in a similar type of role makes complex deployments easy to implement. For example, an Octopus Deploy user can push Git and VS Code to the company's developers, a productivity suite and payroll program to the HR department, and sales tracking and employee management software packages to a set of executives. The differences between the deployments don't add time to their release, which follows a point-and-click process.
Dig Deeper on Systems automation and orchestration