Getty Images
How to build a Kubernetes operator
Operators unleash the full power of developing complicated offerings or abstractions on Kubernetes. And, while they have a lot of potential, there is a steep learning curve.

Kubernetes is a platform for building platforms, which means it is perfect for creating workflows that suit an organization's needs. Kubernetes' operator pattern is key to enable custom workflows and abstractions, and developing operators enables engineers to tap into Kubernetes as a platform provider.
In this tutorial, we build an internal application hosting platform for our developers. An application hosted in this platform collects generic input and then deploys applications in a standardized and opinionated way. For this tutorial, we create a Kubernetes deployment behind the scenes based on user input, but more resources could be added, such as services and Ingress.
The goal is to create abstractions so application developers can easily host their applications on the platform.
The source code repository for the operator we develop can be found on this linked GitHub repo.
System requirements to develop operators
To develop Go-based operators, your machine requires the following:
- Go. Install it locally. Experience with the language is required to build Go-based operators.
- Operator SDK. This has two components:
- Operator-sdk. The command-line interface (CLI) tool and SDK facilitate the development of operators.
- Operator lifecycle manager. This facilitates installation, upgrade and role-based access control (RBAC) of operators within a cluster.
- Kubernetes cluster. This should be running locally to test via kind.
- For local development and testing, use with cluster-admin permissions.
- Image registry. For example, use hub.docker.com to publish images.
How to develop an operator
First, let's create a project. The steps are documented in the operator-sdk Go operator walkthrough. We modify the memcached operator presented in that walkthrough for our use case, so I encourage you to try it before attempting to develop your own operator.
Run the commands below to use the operator-sdk CLI to scaffold a project to develop an operator. The CLI takes two arguments:
- --repo is the name to use for the Go module, such as github.com/user/repo.
- --domain is the top-level domain for groups, for example, contoso.com or user.github.io.
# Create a directory to store the operator
mkdir -p $HOME/projects/myplatform-operator

# switch to the directory created
cd $HOME/projects/myplatform-operator

# Force using Go modules
export GO111MODULE=on

# Run the operator-sdk CLI to scaffold the project structure
operator-sdk init --domain=dexterposh.github.io --repo=github.com/DexterPOSH/myplatform
operator --skip-go-version-check
Author's note: The operator-sdk init command generates a go.mod file to use with Go modules. The --repo flag is required when creating a project outside of $GOPATH/src/ because generated files require a valid module path.
The above command creates several files, but the important one to note is the PROJECT file. This file contains metadata about the project, and the next runs of the operator-sdk CLI will use this information.
The main.go file shows the code that initializes and runs the manager. The manager registers the scheme for all custom resource API definitions and runs controllers and webhooks.
Below is the code snippet from the main.go file and shows the manager being instantiated. However, we don't touch this file in this tutorial.
mgr, err := ctrl.NewManager(ctrl.GetConfigOrDie(), ctrl.Options{
       Scheme:                 scheme,
       MetricsBindAddress:     metricsAddr,
       Port:                   9443,
       HealthProbeBindAddress: probeAddr,
       LeaderElection:         enableLeaderElection,
       LeaderElectionID:       "4c2c7edb.dexterposh.github.io",
   })
Create an API and controller
Once we have the base project structure scaffolded, it is time to add an API and a corresponding controller for it.
The operator-sdk CLI enables users to develop the API and the controller. Run the following command to create the files:
# Use the cli to bootstrap the api and controller, press ‘y’ to create api & controller
operator-sdk create api --group=myplatform --version=v1alpha1 --kind=InhouseApp
Now, the operator-sdk CLI has scaffolded the necessary files. It is time to define the custom resource.
Below is the boilerplate code in the file <kind>_types.go:
type InhouseAppSpec struct {
   // INSERT ADDITIONAL SPEC FIELDS - desired state of cluster
   // Important: Run "make" to regenerate code after modifying this file

   // Foo is an example field of InhouseApp. Edit inhouseapp_types.go to remove/update
   Foo string `json:"foo,omitempty"`
}
A Go struct is a user-defined type. To begin, add the required input fields for our custom resource InhouseApp's specification. Note how to add different fields using the details below as guidelines:
- AppId -- unique name for the app. This is a string identifier for the application.
- Language -- application development language, for example C#, Python or Go. This is a predefined language that our framework supports.
- OS -- the type of OS on top of which the application is deployed. It can be either Windows or Linux, the latter of which is the default OS.
- InstanceSize -- predefined CPU and memory sizes. Allowed values are small, medium and large, where small could mean 100m CPU and 512 mebibytes of memory for the created pods.
- EnvironmentType -- metadata classifying the type of environment for the app. The allowed values are dev, test and prod.
- Replicas -- the minimum number of replicas to maintain for the app. The default value is 1.
Translating the above requirement to the fields of the struct provides the output below:
type InhouseAppSpec struct {
   // INSERT ADDITIONAL SPEC FIELDS - desired state of cluster
   // Important: Run "make" to regenerate code after modifying this file

   // AppId uniquely identifies an app on MyPlatform
   AppId string `json:"appId"`

   // Language mentions the programming language for the app on the platform
   // +kubebuilder:validation:Enum=csharp;python;go
   Language string `json:"language"`

   // OS specifies the type of Operating System
   // +kubebuilder:validation:Optional
   // +kubebuilder:validation:Enum=windows;linux
   // +kubebuilder:default:=linux
   OS string `json:"os"`

   // InstanceSize is the T-Shirt size for the deployment
   // +kubebuilder:validation:Optional
   // +kubebuilder:validation:Enum=small;medium;large
   // +kubebuilder:default:=small
   InstanceSize string `json:"instanceSize"`

   // EnvironmenType specifies the type of environment
   // +kubebuilder:validation:Enum=dev;test;prod
   EnvironmentType string `json:"environmentType"`

   // Replicas indicate the replicas to mantain
   // +kubebuilder:validation:Optional
   // +kubebuilder:default:=1
   Replicas int32 `json:"replicas"`
}
There are a few things to note for the fields added to the struct:
- The comments of the format // +kubebuilder:* are marker comments that generate code automatically.
- A marked comment of format // +kubebuilder:validation:Enum defines an enum value for the field.
- // +kubebuilder:default: sets a default value for a field. But this needs to be paired up with a // +kubebuilder:validation:Optional marker comment, or it won't work.
Also, we track the pods our deployment uses by adding a field under the InhouseAppStatus struct:
   // InhouseAppStatus defines the observed state of InhouseApp
type InhouseAppStatus struct {
   // INSERT ADDITIONAL STATUS FIELD - define observed state of cluster
   // Important: Run "make" to regenerate code after modifying this file

   // Pods are the name of the Pods hosting the App
   Pods []string `json:"pods"`
}
As part of the development workflow, remember to run the make commands below to update the generated code whenever the *_types.go files are modified:
make generate
The next command generates the custom resource definitions automatically by inspecting the *_types.go file:
make manifests
Author's note: The second command runs a utility to implement the runtime.Object interface, which all Kubernetes types should implement; it's done automatically for our type.
Let's switch gears and look at the <kind>_controller.go file, which contains our controller.
It's the developer's responsibility to implement the Reconcile method in this file. This method runs every time an event changes the corresponding resource defined in our API. The Reconcile method is passed a Request argument, which contains a Namespace and Name that uniquely identify the resource. IT admins use this information to look up the resource.
Notice the comments before the Reconcile() method. These define the required RBAC permissions to run this controller. Take a moment to read through the comments for the Reconcile() function. This function is core to the logic of this process and examines the custom resources created, as well as handle the logic of converging the desired state.
//+kubebuilder:rbac:groups=myplatform.dexterposh.github.io,resources=inhouseapps,verbs=get;list;watch;create;update;patch;delete
//+kubebuilder:rbac:groups=myplatform.dexterposh.github.io,resources=inhouseapps/status,verbs=get;update;patch
//+kubebuilder:rbac:groups=myplatform.dexterposh.github.io,resources=inhouseapps/finalizers,verbs=update
Add this logic to the controller to provision the underlying resources required to host our in-house application. Head over to the <kind>_controller.go file for your resource. In the file, there is an empty Reconcile() method definition.
func (r *InhouseAppReconciler) Reconcile(ctx context.Context, req ctrl.Request) (ctrl.Result, error) {
   _ = log.FromContext(ctx)
   // your logic here
   return ctrl.Result{}, nil
}
Begin to fill in the required code to create a deployment for our custom resource. Start by creating a logger, and then look up the InhouseApp custom resource using the NamespacedName. If we don't find an instance of our custom resource, we return an empty result and no errors, as the instance might be deleted -- so no need for further processing.
Returning an empty result with no error indicates to the controller that this object has converged to the desired state. Do not process it until something changes in the custom resource.
// your logic here
   logger := log.Log.WithValues("inhouseApp", req.NamespacedName)

   logger.Info("InhouseApp Reconcile method...")

   // fetch the inhouseApp CR instance
   inhouseApp := &myplatformv1alpha1.InhouseApp{}
   err := r.Get(ctx, req.NamespacedName, inhouseApp)
   if err != nil {
       if errors.IsNotFound(err) {
           // Request object not found, could have been deleted after reconcile request.
           // Owned objects are automatically garbage collected. For additional cleanup logic use finalizers.
           // Return and don't requeue
           logger.Info("InhouseApp resource not found. Ignoring since object must be deleted")
           return ctrl.Result{}, nil
       }
       logger.Error(err, "Failed to get InhouseApp instance")
       return ctrl.Result{}, err
   }
Now, if we have found an instance of our custom resource, InhouseApp, check if a deployment already exists for it. If the deployment object is not found, create one and requeue. We requeue so that the next time the Reconcile method is kicked for this instance, it finds the deployment and proceeds to the next section. If there is any other error, an empty result and an error return.
// check if the deployment already exists, if not create a new one
   found := &appsv1.Deployment{}
   err = r.Get(ctx, types.NamespacedName{Name: inhouseApp.Name, Namespace: inhouseApp.Namespace}, found)
   if err != nil && errors.IsNotFound(err) {
       // define a new deployment
       dep := r.deploymentForInhouseApp(inhouseApp) // deploymentForInhouseApp() method returns a deployment object back
       logger.Info("Creating a new Deployment", "Deployment.Namespace", dep.Namespace, "Deployment.Name", dep.Name)
       err = r.Create(ctx, dep)
       if err != nil {
           logger.Error(err, "Failed to create new Deployment", "Deployment.Namespace", dep.Namespace, "Deployment.Name", dep.Name)
           return ctrl.Result{}, err
       }
       // deployment created, return and requeue
       return ctrl.Result{Requeue: true}, nil
   } else if err != nil {
       logger.Error(err, "Failed to get Deployment")
       // Reconcile failed due to error - requeue
       return ctrl.Result{}, err
}
Once the deployment object is created, ensure the number of replicas specified in the user input are the same that exist for the deployment.
The code snippet below checks this and updates the deployment if there is a mismatch and requeues:
// This point, we have the deployment object created
   // Ensure the deployment size is same as the spec
   replicas := inhouseApp.Spec.Replicas
   if *found.Spec.Replicas != replicas {
       found.Spec.Replicas = &replicas
       err = r.Update(ctx, found)
       if err != nil {
           logger.Error(err, "Failed to update Deployment", "Deployment.Namespace", found.Namespace, "Deployment.Name", found.Name)
           return ctrl.Result{}, err
       }
       // Spec updated return and requeue
       // Requeue for any reason other than an error
       return ctrl.Result{Requeue: true}, nil
   }
Now, we have taken care of converging the desired state for our InhouseApp. However, remember we added a Pods field to the InhouseStatus struct earlier that holds the name of the pods for our InhouseApp; it's time to set that in our Reconcile() method.
First, list the pods with the correct labels. Then, use the utility function getPodNames() to fetch the podNames from the podList. Once we have the list of pod names, we compare it with the current pods list set in the status. If that differs, update the InhouseApp instance, and return. If there are any errors, an empty result returns, and an error requeues the method execution.
// Update the InhouseApp status with pod names
   // List the pods for this InhouseApp's deployment
   podList := &corev1.PodList{}
   listOpts := []client.ListOption{
       client.InNamespace(inhouseApp.Namespace),
       client.MatchingLabels(inhouseApp.GetLabels()),
   }

   if err = r.List(ctx, podList, listOpts...); err != nil {
       logger.Error(err, "Falied to list pods", "InhouseApp.Namespace", inhouseApp.Namespace, "InhouseApp.Name", inhouseApp.Name)
       return ctrl.Result{}, err
   }
   podNames := getPodNames(podList.Items)

   // Update status.Pods if needed
   if !reflect.DeepEqual(podNames, inhouseApp.Status.Pods) {
       inhouseApp.Status.Pods = podNames
       err := r.Update(ctx, inhouseApp)
       if err != nil {
           logger.Error(err, "Failed to update InhouseApp status")
           return ctrl.Result{}, err
       }
   }

   return ctrl.Result{}, nil
At any point in the development workflow, admins can run the make build command to build the operator.
How to run an operator
Once the operator is ready, it's time to run it in one of the following three ways:
- Run locally on the developer machine as a Go program. This approach requires access to the cluster and kubeconfig file.
- Run as a deployment in the cluster. This uses the in-cluster configuration.
- Bundle the operator with Operator Lifecycle Manager (OLM), and let it manage the deployment lifecycle.
For this tutorial, we run this locally -- method one above -- to debug the operator. But, to run it in a cluster using OLM, refer to the documentation here.
To run the operator project locally as a Go program, issue the make install run command.
When we run this operator, we receive the below log. This means our operator is up and running, but we don't see any major activity. There's a caveat to the InhouseApp operator we are building.
2021-11-22T17:44:30.660+0530    INFO    controller-runtime.metrics      metrics server is starting to listen    {"addr": ":8080"}
2021-11-22T17:44:30.660+0530    INFO    setup   starting manager
2021-11-22T17:44:30.660+0530    INFO    controller-runtime.manager      starting metrics server {"path": "/metrics"}
2021-11-22T17:44:30.660+0530    INFO    controller-runtime.manager.controller.inhouseapp        Starting EventSource    {"reconciler group": "myplatform.dexterposh.github.io", "reconciler kind": "InhouseApp", "source": "kind source: /, Kind="}
2021-11-22T17:44:30.660+0530    INFO    controller-runtime.manager.controller.inhouseapp        Starting Controller     {"reconciler group": "myplatform.dexterposh.github.io", "reconciler kind": "InhouseApp"}
2021-11-22T17:44:30.760+0530    INFO    controller-runtime.manager.controller.inhouseapp        Starting workers        {"reconciler group": "myplatform.dexterposh.github.io", "reconciler kind": "InhouseApp", "worker count": 1}
The caveat to building our InhouseApp operator is in the function deploymentForInhouseApp(). This function returns a deployment object that defines a spec with hardcoded values for the container image it looks up and deploys and the deployment name. We can add some generic logic to build our Docker images as part of our InhouseApp CI/CD pipeline, such as Organization/<AppId>-<EnvironmentType>:<Version>, but for now, this is static.
Spec: corev1.PodSpec{
                   Containers: []corev1.Container{{
                       Image: "dexterposh/myappp-dev", //hard-coded here, make this dynamic
                       Name:  "inhouseAppDeployment",  //hard-coded here, make this dynamic
                       Ports: []corev1.ContainerPort{{
                           ContainerPort: 8080,
                           Name:          "http",
                       }},
                   }},
               },
Now, we can run the operator locally again and keep it running in a terminal instance.
make install run
Let's create an instance for the InhouseApp using the below YAML. Sample YAML is stored in the path myplatform-operator/config/samples. It contains the YAML file for our custom resource, along with a kustomization.yaml file.
apiVersion: myplatform.dexterposh.github.io/v1alpha1
kind: InhouseApp
metadata:
 name: inhouseapp-sample-go-app
spec:
 # Add fields here
 appId: myapp
 environmentType: dev
 language: go
Run the below command to apply the YAML files in the samples repo:
kubectl apply -k ./config/samples
Once done, notice some activity in the console where the operator is running locally:
I1122 18:45:18.484327   12755 request.go:668] Waited for 1.033724852s due to client-side throttling, not priority and fairness, request:
GET:https://127.0.0.1:54421/apis/apiextensions.k8s.io/v1beta1?timeout=32s
2021-11-22T18:45:18.589+0530     INFO controller-runtime.metrics metrics server is starting to listen {"addr": ":8080"}
2021-11-22T18:45:18.590+0530     INFO setup starting manager
2021-11-22T18:45:18.590+0530     INFO controller-runtime.manager starting metrics server  {"path": "/metrics"}
2021-11-22T18:45:18.591+0530     INFO controller-runtime.manager.controller.inhouseapp Starting EventSource  {"reconciler group": "myplatform.dexterposh.github.io", "reconciler kind": "InhouseApp", "source": "kind source: /, Kind="}
2021-11-22T18:45:18.591+0530     INFO controller-runtime.manager.controller.inhouseapp Starting Controller   {"reconciler group": "myplatform.dexterposh.github.io", "reconciler kind": "InhouseApp"}
2021-11-22T18:45:18.696+0530     INFO controller-runtime.manager.controller.inhouseapp Starting workers {"reconciler group": "myplatform.dexterposh.github.io", "reconciler kind": "InhouseApp", "worker count": 1}
2021-11-22T18:45:45.666+0530     INFO InhouseApp Reconcile method...     {"inhouseApp": "default/inhouseapp-sample-go-app"}
2021-11-22T18:45:45.770+0530     INFO Creating a new Deployment  {"inhouseApp": "default/inhouseapp-sample-go-app", "Deployment.Namespace": "default", "Deployment.Name": "inhouseapp-sample-go-app"}
2021-11-22T18:45:45.825+0530     INFO InhouseApp Reconcile method...     {"inhouseApp": "default/inhouseapp-sample-go-app"}
You can verify now that this created a deployment for the instance of the InhouseApp custom resource.
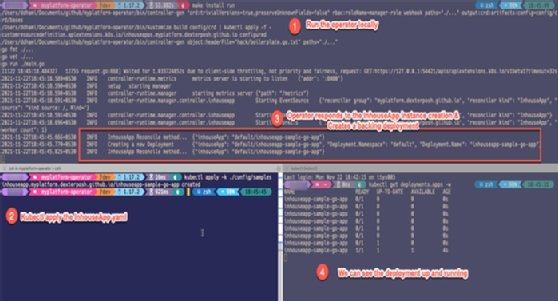
In the first terminal instance of the figure below, we run the app locally; in the second step, we apply the YAML files describing an InhouseApp definition; in the third, the operator responds to the event -- immediately upon instance creation -- and creates a backing deployment; and in the fourth, we can see that the deployment is running.