Build and deploy a microservice with Kubernetes
Ready to run microservices in production? Follow along to create a containerized microservice and deploy it on Kubernetes in this step-by-step tutorial.

Microservices break down an application into smaller independent pieces, but IT admins still need a way to manage them. With Kubernetes, they can automatically manage and scale containerized microservices. This tutorial first covers how Kubernetes benefits microservices and then dives into the technical steps required to deploy microservices via Docker containers and finally how to use Kubernetes to manage and scale them.
Benefits of Kubernetes for microservices
Containerization with Kubernetes orchestration and management is designed to support microservices. Before you use the tutorial to build a Kubernetes deployment, you should decide if it is a fit for your project. Some high-level advantages Kubernetes offers for microservice architecture are:
- Self-healing. When a container fails or is unhealthy, Kubernetes replaces it automatically to maintain a desired state configuration and the overall health of the application.
- Declarative configuration management and version control. Kubernetes configurations are stored in YAML formatted files that can be version controlled with source control software, such as Git. The configurations can be applied to create or update resources.
- Multi-cloud and hybrid cloud. Kubernetes enables IT teams to choose a cloud platform onto which to put workloads, such as Google Cloud Platform, Microsoft Azure or AWS, so that they can avoid vendor lock-in.
- Service exposure and load balancing. Kubernetes exposes containers in pods, or groups of pods, using DNS or IP addresses so that other microservices can consume those resources. IT admins can also load balance logical pod groupings without much effort.
- Secrets management. Kubernetes helps prevent exposure of sensitive information, such as passwords, in container images and supports secret objects with help from the etcd datastore.
- Scalability. When under high demand or an increase in load, Kubernetes horizontally scales the number of containers that run a microservice to avoid performance issues.
- Zero downtime. Kubernetes deployments create additional pods with a newly released image without destroying the existing containers, to ensure no downtime. Once the new containers are up and healthy, teams can roll out updates and delete old containers. If new containers fail, IT teams can roll back changes with minimal downtime.
Create a golang REST API
To get started with Kubernetes for microservices, let's create a REST API that we will deploy as a microservice in containers on Kubernetes.
All of the necessary files to complete this Kubernetes microservices tutorial are available in a GitHub repository. Clone the repository with the following command to download the necessary files:
git clone https://github.com/PrateekKumarSingh/microsvc-golang
Once you clone the repository, change your directory path to the repository folder to access your files.
cd .\microsvc-golang\
This folder contains a main.go file, which is written in Google's Go language, also called golang. The file enables us to create an HTTP listener and routes such as http://localhost:8080/employee, which will act as a REST endpoint. If you don't have Go on your local system, download and install it from the golang website.
This article is part of
What are microservices? Everything you need to know
Next, commit the project with the command go build ., which will consume the file main.go. If the build is successful, it will generate an executable file -- microsvc-golang.exe -- with the folder name as shown in Figure 1.
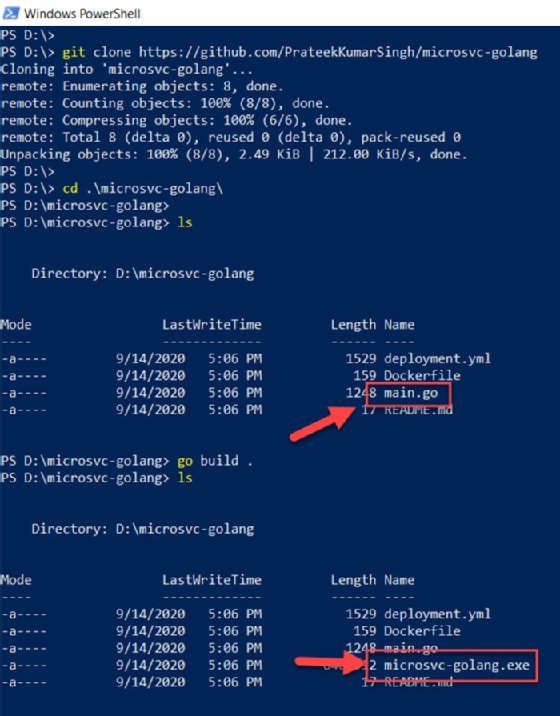
The command .\microsvc-golang.exe runs the executable, creates the HTTP listener and makes the endpoint accessible.
Launch a PowerShell console and use the Invoke-RestMethod cmdlet on the endpoint to retrieve employee data, as demonstrated in Figure 2.
Invoke-RestMethod http://localhost:8080/employee
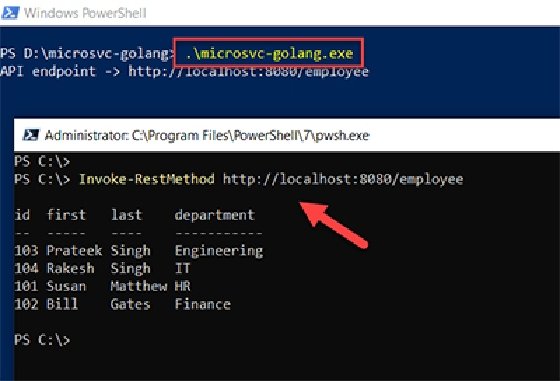
IT admins also have the option to run a curl command on this endpoint; it will display a similar behavior.
At this point in the Kubernetes microservices tutorial, the REST API is operational. Now you can deploy this code on containers in Kubernetes. To start, create a Docker container image.
Why Microservices?
Microservices-based architecture is an application made of multiple microservices, where each handles a unique function or requests for specific tasks. This setup creates a manageable, independently deployable and, overall, more reliable architecture than a tightly coupled monolithic architecture.
A few advantages of microservices-based architecture over monolithic applications are:
- Faster release cycles. Microservices can be developed, updated and scaled individually from the overall application.
- Developer productivity. Individual microservices require less time to update and test than a monolithic application.
- Collaboration. Different developers and teams can work on different microservices and components simultaneously.
- No single point of failure. If a microservice fails, the rest of the services are still up and running, whereas monoliths have tight dependencies between services.
- Scalability. Microservices easily scale for specific needs, not as a whole app.
- Reusability. Each microservice performs a unique function, so it can be used in multiple processes.
Containerize the application using Docker
To use this REST API code in a container, we create container images with the following command:
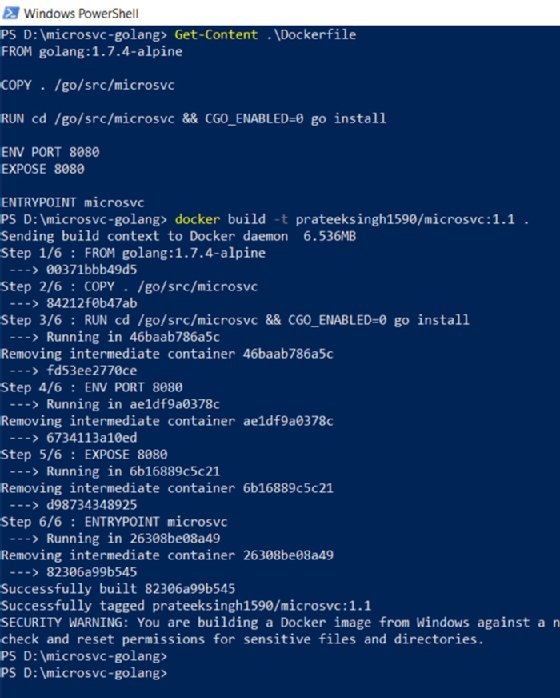
Get-Content .\Dockerfile
This tutorial uses Docker. The GitHub repository contains a Dockerfile, which looks like this:
FROM golang:1.7.4-alpine

COPY . /go/src/microsvc

RUN cd /go/src/microsvc && CGO_ENABLED=0 go install

ENV PORT 8080
EXPOSE 8080

ENTRYPOINT microsvc
This file takes an existing image, golang:1.7.4-alpine in this example, and copies the code into that image. It then builds and exposes it on port 8080 and finally runs the application in the container to start the HTTP listeners.
From the same folder, use the docker build command to build the image under the instructions in the Dockerfile. Use -t to tag the image with a name and version:
docker build -t prateeksingh1590/microsvc:1.1 .
Once the build is complete, use the following command to check if the image has been created:
docker images prateeksingh1590/microsvc:1.1
Log in and push the image to the Docker Hub repository to make it publicly available:
docker login -u prateeksingh1590
docker push prateeksingh1590/microsvc:1.1

The time needed for the Docker image push to complete depends on the size of the image. In the meantime, run the following command to test the Docker image locally:
docker run -p 8080:8080 prateeksingh1590/microsvc:1.1
This command will run the Go application inside the Docker container and expose it on port 8080. If accessing the endpoint yields the desired output, the Docker image is operational. Figure 5 also verifies that, unless you run the Docker image in a container, the endpoint is not available.

Deploy the Go microservice to Kubernetes locally
At this point, we have a working container image hosting an active instance of the Go application, which can serve as a REST endpoint.
Use this image to deploy a container in Kubernetes as a microservice, the final step of this tutorial.
The cloned GitHub repository also has a Deployment.yml file, which looks like the following code sample. This is a Kubernetes configuration file to deploy the Docker images in Kubernetes:
apiVersion: apps/v1
kind: Deployment
metadata:
  name: microsvc
  labels:
    app: microsvc
spec:
  replicas: 1
  revisionHistoryLimit: 10
  minReadySeconds: 5
  selector:
    matchLabels:
      app: microsvc
  strategy:
    type: RollingUpdate
    rollingUpdate:
      maxUnavailable: 1
      maxSurge: 2
  template:
    metadata:
      labels:
        app: microsvc
        tier: service
    spec:
      containers:
      - name: microsvc
        image: "prateeksingh1590/microsvc:1.1"
        imagePullPolicy: Always
        resources:
          requests:
            memory: "64Mi"
            cpu: "125m"
          limits:
            memory: "128Mi"
            cpu: "250m"
        ports:
        - containerPort: 8080
        readinessProbe:
          httpGet:
            path: /
            port: 8080
          initialDelaySeconds: 5
          timeoutSeconds: 5
        livenessProbe:
          httpGet:
            path: /
            port: 8080
          initialDelaySeconds: 5
          timeoutSeconds: 5
        env:
        - name: PORT
          value: "8080"
---
apiVersion: v1
kind: Service
metadata:
  name: microsvc
  labels:
    app: microsvc
    tier: service
spec:
  type: NodePort
  ports:
  - port: 8080
  selector:
    app: microsvc
---
apiVersion: extensions/v1beta1
kind: Ingress
metadata:
  name: microsvc
  labels:
    app: microsvc
    tier: backend
spec:
  backend:
    serviceName: microsvc
    servicePort: 8080
Run the following command with the file name to deploy the created image into containers.
kubectl create -f .\deployment.yml
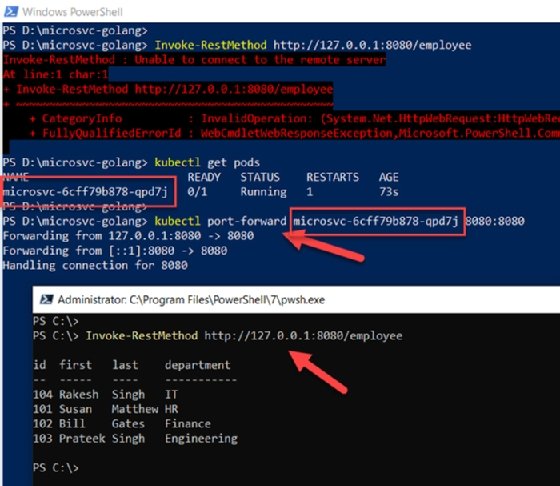
You can check if the containers are running. The following command lists the pods that have the REST endpoint running as a microservice on Kubernetes. Once the status of pods is Running, forward the container to local port 8080 using the container 'NAME' to local machine port to access the endpoint.
kubectl get pods
kubectl port-forward microsvc-6cff79b878-qpd7j 8080:8080
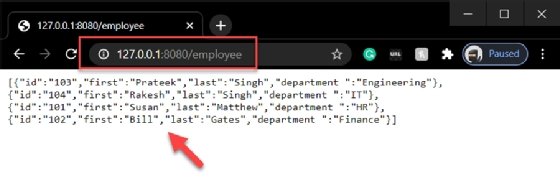
Once the ports are exposed, these containerized Go language-based REST endpoints are accessible on the local machine on port 8080. When you run the cmdlet Invoke-RestMethod http://127.0.0.1:8080/employee from a PowerShell console, it will yield results as demonstrated in Figure 7.
Additionally, you can launch a web browser and visit http://127.0.0.1:8080/employee to view the JSON results from the container's REST endpoint. Kubernetes enables us to scale the number of pod instances horizontally by increasing the Kubernetes ReplicaSets and updating deployments to adapt any stress or high load scenarios.
We can deploy similar microservices in the Kubernetes cluster. Consider examples like MongoDB databases, a web server or any other REST endpoint. Once you build up a deployment of microservices, communication between them is a key consideration.
Communication between microservices on Kubernetes
There are multiple ways to expose an application running in Kubernetes:
The most prominent approach is to use one of Kubernetes' services, which is basically an abstraction -- or a logical entity -- of pods on a network. There are various kinds of services that offer different functionalities, such as:
- ClusterIP exposes the service on a cluster-internal IP, and Kubernetes' default service option.
- NodePort exposes the application on a node-level static IP and port, so that it is accessible outside the cluster with an IP address and port combination.
- LoadBalancer exposes the application as a service to a cloud-hosted load balancer component that points to the service.
- ExternalName maps service <IPAddress:Port> to external addresses and names using a CNAME record.
For internal communication, you can use the ClusterIP and DNS services to configure fully qualified domain names such as http://get-employee-microsvc.default.svc.cluster.local and http://new-employee-microsvc.default.svc.cluster.local that can be uniquely identified and accessed from within the cluster.
Apart from services, you can also use Kubernetes Ingress to export HTTP/ HTTPS services externally.
Dig Deeper on Containers and virtualization
-
![]()
Use Dapr on Kubernetes to build microservices in production
By: Deepak Dhami
-
![]()
How to use docker-compose with Apache httpd example
By: Cameron McKenzie
-
![]()
Imperative vs. declarative Kubernetes commands: What's the difference?
By: Bob Reselman
-
![]()
Use Jenkins for deployment, support and provisioning in ops
By: Stephen Bigelow