Kubernetes basics: A step-by-step implementation tutorial
This Kubernetes implementation example demonstrates how to create a single-node cluster on Windows 10 to get a containerized application up and running.

Containerization enables developers and system administrators to quickly deploy applications and scale them to their requirements, without downtime. With container orchestration and management, IT organizations can manage cloud-native and distributed applications, and package legacy applications for increased portability and efficient deployment.
Kubernetes, the de facto technology for container management and orchestration, is renowned for being complex to set up and implement. However, once it's up and running, it is highly configurable, and serves as the engine for an organization's modern IT efforts.
Let's get started with the key steps and Kubernetes commands for a basic Kubernetes implementation.
Basic Kubernetes architecture
First, it's useful to understand the foundation of a Kubernetes system, which revolves around four important concepts: nodes, pods, deployments and services. The servers that run the containers -- and the applications inside them -- are called nodes. A master server controls, manages and configures these node servers. The master also manages pods, or a group of one or more containers that resides on nodes.
The master server acts as the control plane for the Kubernetes clusters. The main purpose of the various components in the control plane is to maintain a record of all Kubernetes objects and to continuously manage the desired state of the cluster by automatically responding to changes.
There are four major components of a control plane:
- Etcd. The most fundamental component of a Kubernetes cluster, etcd is a lightweight available configuration store. It can be set up across more than one Kubernetes node. Its main purpose is to store configuration data that's accessible to each node in the Kubernetes cluster.
- Kube-apiserver. This is a RESTful interface for command-line tools such as kubectl, providing them a way to interact with the Kubernetes cluster. In simpler terms, it serves as a management point for various tools to control and configure Kubernetes clusters through REST APIs.
- Kube-controller-manager. The primary role of this service is to maintain the state of a cluster, such as the number of replicas. If any variation in desired state is observed, the kube-controller-manager runs required procedures to make sure that the desired state is met.
- Kube-scheduler. This component's primary responsibility is to schedule cluster workloads based on configurations, resource requirements and workload-specific requirements.
There are several components of node servers that make it possible for the master to work with them. These include:
- Container runtime. To run applications encapsulated in a pod that exists on nodes, we need a lightweight, isolated operating environment: the container. A container runtime is a tool, such as Docker, to create, deploy and run applications.
- Kubelet. A kubelet is an agent or a service that is installed on nodes to communicate with and receive commands from the master node. It directs actions that need to be performed on the node, such as to create, scale and delete containers.
- Kube-proxy. This proxy service relays requests to the correct container and performs load balancing. Kube-proxy also performs host-level subnetting to ensure services are accessible to other components.
Kubernetes implementation steps
In this tutorial, we'll create a single-node cluster that runs on the Windows 10 operating system.
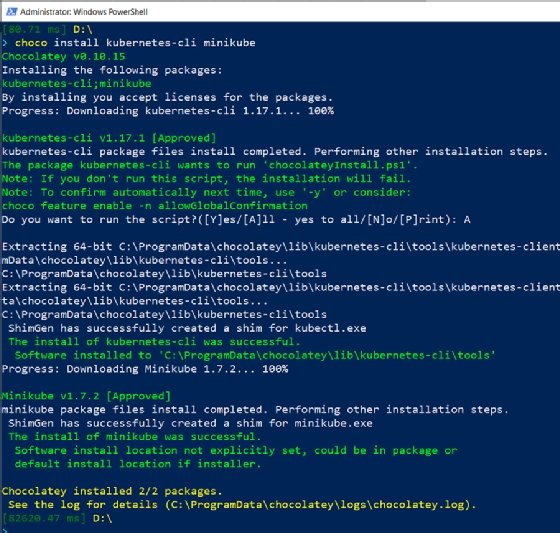
To install and set up Kubernetes on Windows, load kubectl and install minikube. The Chocolatey package manager helps in this process. A command-line tool, kubectl runs commands against Kubernetes clusters, while minikube is a tool that enables us to run a single-node cluster in a VM on a machine. Enter the command:
choco install Kubernetes-cli minikube
This will return an output that looks as follows:
Now, run the following command and verify that kubectl is installed on your machine:
kubectl.exe version --client
You must see an output like in the following screenshot:

Next, spin up a worker machine -- or node -- in Kubernetes. It can be a physical or virtual machine. To do this, use the following command to start minikube:
minikube start
This will return an output as shown below:
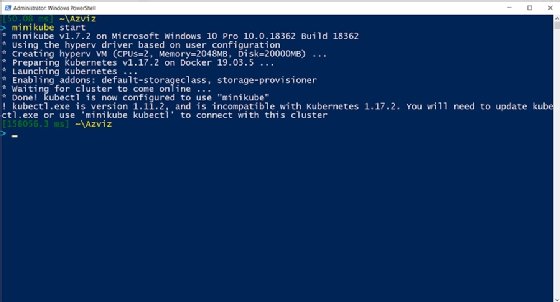
Since we are installing Kubernetes on Windows, use Hyper-V to launch a VM and set up a Kubernetes cluster on the VM.
This completes the setup.
Running Kubernetes containers
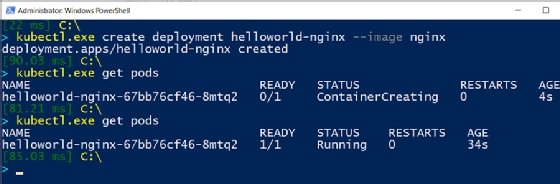
To start containers, use the Kubernetes command below to create a deployment. Provide a name for the deployment and the container image to deploy. Kubernetes will automatically pick Docker as the default container runtime. Here we use an image that will run the Nginx web server:
kubectl.exe create deployment my-nginx --image nginx
When a deployment is created, Kubernetes builds pods to host application instances.
Enter get pods just after running the previous command to catch the ContainerCreating status as pods are deployed:
kubectl.exe get pods
This will complete in a few seconds and the container status should change to Running:
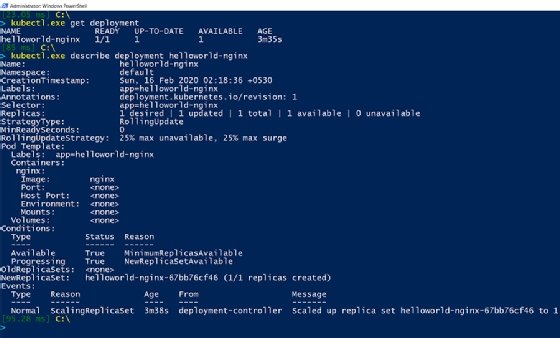
Use the describe keyword with the deployment name, as shown below, to see more detailed information about deployments:
kubectl.exe get deployment
kubectl.exe describe deployment helloworld-nginx
This returns results, such as number of replicas, desired state and timestamps:
In this Kubernetes implementation tutorial, we run only one container or Nginx server, but sometimes it's necessary to accommodate increased workload and traffic. In that case, scale up the number of application instances. This can be achieved using kubectl scale deployment with a --replicas parameter:
kubectl.exe scale deployment helloworld-nginx --replicas 4
Check the deployment. You will observe that four replicas of the application instance have been deployed:

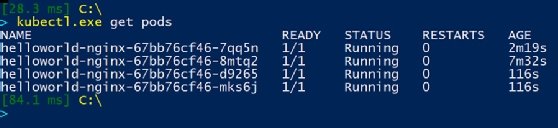
Now, check the Kubernetes pods; there should be four containers running on the node:
Deploy your app
Now there is an application running in multiple containers with their own IP addresses. Next, expose them outside the cluster so that the application is accessible:
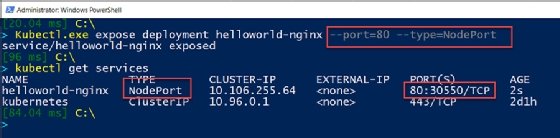
Kubectl.exe expose deployment helloworld-nginx --port=80 --type=NodePort
Verify this via the kubectl get services command. This will return a service type of NodePort to expose port 80 on each node of the Kubernetes cluster. This service is an abstraction layer that basically load balances and groups more than one pod in a cluster that shares an IP address.
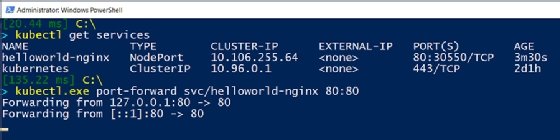
To open this application in a web browser, create a proxy to connect the local port to the cluster port, which we exposed using the NodePort service in the previous step:
kubectl.exe port-forward svc/helloworld-nginx 80:80
This will look as follows:
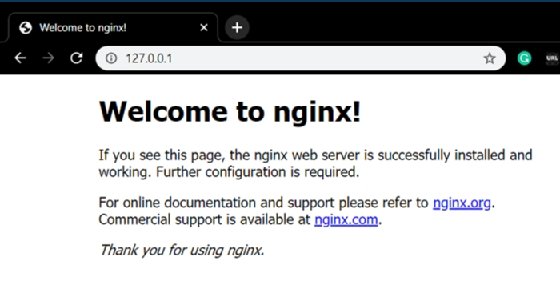
Go to the web browser and open http://127.0.0.1/ or http://localhost/ to see the homepage of the Nginx web server deployed in Kubernetes containers.
Test the Kubernetes control plane
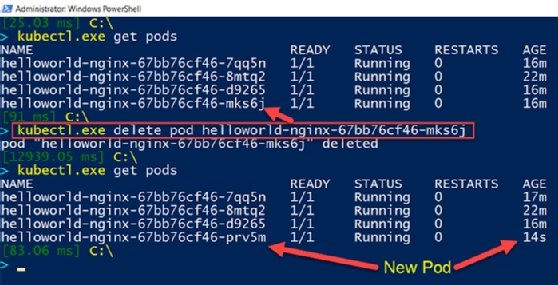
Lastly, test that the Kubernetes control plane, or master server, is able to maintain the desired state of the pods that run on the node server. To check this, use the following command to forcibly delete one of the pods that runs the application instance:
kubectl.exe delete pod helloworld-nginx-67bb76cf46-mks6j
This undesired state will be identified, and Kubernetes will immediately run a new instance of the application in a container:
What's next for your Kubernetes implementation?
Once you have the basics of Kubernetes deployment under your belt, think about how you can extend this knowledge. Some related areas you'll likely encounter:
- Be ready to troubleshoot some common Kubernetes problems that can impede performance, from unavailable nodes and unresponsive containers to resource-hogging workloads.
- Some critical enterprise workloads demand high availability, which requires a more specific approach to Kubernetes implementation. Learn how to plan out a container deployment to ensure redundancy and high availability.
- Address security at the container level in various ways, such as creating multiple security layers and scanning container images for vulnerabilities.