
Getty Images
Learn how to install MicroK8s for Kubernetes
MicroK8s enables admins to deploy and destroy Kubernetes in a flash. Follow this tutorial to learn how to install MicroK8s and combine with Multipass.

Kubernetes is a ubiquitous name in container management and is not only recommended, but nearly required for success with containers. However, Kubernetes is a hefty program with a vast array of add-ons and features -- not all of which are necessarily useful to the average IT pro.
MicroK8s is a Kubernetes distribution designed to be small and responsive and to include required components only. It is also designed to be fast and efficient to use, with several useful tools IT admins can activate via the command line.
Because MicroK8s is so small, an installation could require less than 12 GB of RAM, and it can run on a modern Raspberry Pi. Consequently, its small size means that it can be built and run on a single developer workstation, which also eases tear-down and recreation.
An additional benefit to MicroK8s is that it's ideal for edge and other devices with modest performance offerings. MicroK8s is also deemed stable for production use by Canonical.
Install MicroK8s
First, ensure your system is up to date before installing MicroK8s on your machine. This can be done using the following commands:
sudo apt-get update
sudo apt-get upgrade -y
MicroK8s installs as a snap package and deploys on a modern Ubuntu server via the sudo snap install microk8s --classic command.
The sudo command requires individualized privilege elevation. To save time, use the following command to add the current user profile to the MicroK8s group, which runs the installation:
sudo usermod -a -G microk8s $USER
sudo chown -f -R $USER ~/.kube
Reboot when complete, and find a single MicroK8s node ready for use.
It is best practice to run at least three nodes. To stand up additional nodes, create two additional VMs. To create the MicroK8s cluster, join the VMs together such that they can communicate via secure channels.
To register the nodes, use the microk8s add-node command on the initial node to initiate the joining process.

Copy and paste the output string into the second node. Process initiation takes a few minutes. Repeat this step for any other nodes you wish to join to the cluster. Once complete, run a check to ensure all nodes are available:
microk8s kubectl get nodes
Deploying a pod can be done from the command line. For example, this command installs Nginx on the cluster:
microk8s kubectl create deployment nginx --image=nginx
To create a larger pod, add the required number to the command:
microk8s kubectl create deployment nginx –replicas=2 --image=nginx

MicroK8s timesavers
It is all well and good that there is now a cluster, but now what? Part of the awesomeness of MicroK8s is the services that can be quickly enabled or disabled. Typically, storage and DNS are some of the popular services.
To enable MicroK8s services, use the following command:
microk8s enable dns storage
To disable it, change enable to disable, and run the command again.
The hidden gem: Multipass
The biggest timesaver is Multipass, which is a quick deployment method for Ubuntu microservers. Typically, they deploy in less than a minute. Pairing the functionality of Multipass with Ubuntu snap functionality enables a MicroK8s cluster to complete in less than 10 minutes.
Multipass can be downloaded from the Ubuntu website. Once installed, use the following command from the command line:
multipass launch
These Multipass VMs are multipurpose, not just for MicroK8s and containers. Out of the box, the resources allocated -- 1 CPU, 512 MB of RAM -- are too meager to be of any serious use. However, from the command line, you can add additional CPU, RAM and disk space. The following is an example for creating a larger VM. Tweak this to your own needs and requirements.
multipass launch -c 2 -m 2G -d 20G -n techtarget-example

To access the newly created VM, use this simple command:
multipass shell techtarget-example
Most platforms that run Multipass have GUI access, but the command line is often simpler. Other useful commands include the following:
multipass start <machine name>
multipass stop <machine name>
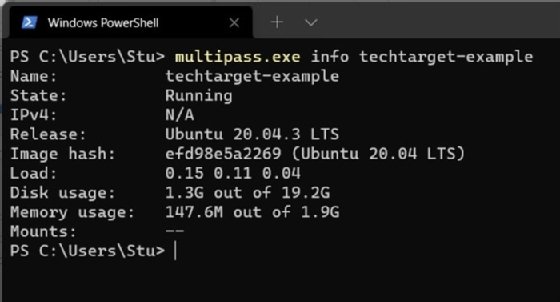
Lastly, multipass info <machine name> displays useful information about the VM in question.
MicroK8s, when combined with Multipass, enables IT admins to stand up an entire Kubernetes cluster within minutes and destroy it once the job is complete. Multipass also can deploy Ubuntu VMs in seconds.