Grafvision - Fotolia
How to use PowerShell in CI/CD pipelines
PowerShell has many uses in CI/CD pipelines. Before DevOps teams dive in, they need to grasp the automation tool's scope, from cloud management to infrastructure testing.

For an IT team to build a complex CI/CD pipeline requires a lot from its toolchain. DevOps teams need a shell that empowers them to perform important tasks with simple commands.
Microsoft's PowerShell is a common shell to manage CI/CD pipelines, including PowerShell-specific pipelines, such as PowerShell modules and PowerShell DSC-based pipelines, as well as .NET and .NET Core deployments.
PowerShell offers three primary benefits in a CI/CD pipeline:
- It's cross-platform.
- All the major cloud providers have a PowerShell module for infrastructure management.
- It has built-in testing capabilities.
PowerShell anywhere
In the context of CI/CD pipelines, PowerShell's most important feature is that it runs on every major platform, from Linux to Apple MacOS to Microsoft Windows. PowerShell is open source as well. This universal compatibility helps reduce costs and simplify pipelines.
For example, an IT team deploying a .NET Core application doesn't have to run its pipeline on Windows. Because PowerShell is not restricted to Windows, the organization won't have to purchase additional Windows Server licenses for the pipeline. Even hosted pipelines should be built with cost in mind. GitHub Actions, as one example, charges twice as much per minute for Windows over Linux, once an IT organization exceeds the allowance of free minutes.
Another cross-platform benefit of PowerShell is that it no longer requires conditional statements in a pipeline definition to run different language scripts on different OSes. For example, here we use the if conditional statement in a GitHub Actions pipeline definition to call different shells to perform the same task, depending on the OS:
steps:
  - name: Bash command
    if: runner.os == 'Linux'
    run: echo $TOKEN
    env:
      PREBUILD_TOKEN: ${{ secrets.TOKEN }}
    shell: bash

  - name: Pwsh command
    if: runner.os == 'Windows'
    run: Write-Host ${env:TOKEN}
    env:
      PREBUILD_TOKEN: ${{ secrets.TOKEN }}
    shell: pwsh
But if GitHub Action workers all have PowerShell available as a shell, this pipeline definition can simplify to:
steps:
  - name: Pwsh command
    run: Write-Host ${env:TOKEN}
    env:
      PREBUILD_TOKEN: ${{ secrets.TOKEN }}
    shell: pwsh
Even though PowerShell is designed to work on multiple platforms, scripts can function differently on one or another. It's up to the person creating automations on PowerShell to ensure cross-platform compatibility. For example, when accessing files or other system resources on Linux, PowerShell is case sensitive, whereas it is not case sensitive on Windows. Use full command names in scripts that will act on multiple platforms, rather than any of the abbreviated forms. For example, the Sort-Object cmdlet has an alias of Sort in PowerShell, but, on Linux, the Sort command refers to a Linux command. Consequently, Sort in PowerShell on Linux also calls the Sort Linux command.
Managing the cloud
When it comes to cloud deployments, all three major cloud providers -- AWS, Microsoft and Google -- have modules that enable DevOps teams to use PowerShell to interact with APIs. This makes it possible to deploy and manage resources both interactively and through scripts.
We can run a PowerShell script via a CI/CD pipeline to get information about a cloud resource and then take action based on the results. For instance, an IT admin wants to deploy a function app in Azure, but only wants to store the resource group name in their yaml file. Assuming the admin adds the authentication dependencies ahead of these steps and sets up the publishing profile, they can do so in GitHub Actions with:
- name: Run Azure PowerShell script
  uses: azure/powershell@v1
  with:
    azPSVersion: '3.1.0'
    inlineScript: |
      $fa = Get-AzFunctionApp -ResourceGroupName "RgName" | Select-Object -First 1
      Write-Host "::set-env name=fa_name::$($fa.name)"

- name: 'Run Azure Functions Action'
  uses: Azure/functions-action@v1
  id: fa
  with:
    app-name: ${{ env.fa_name }}
    package: ${{ env.AZURE_FUNCTIONAPP_PACKAGE_PATH }}
    publish-profile: ${{ secrets.AZURE_FUNCTIONAPP_PUBLISH_PROFILE }}
Notice that I set a variable as well. In CI/CD pipelines, any shell that can output to the host can set a variable -- and that includes PowerShell on GitHub Actions.
Test infrastructure via Pester
Another common scenario for running PowerShell in a CI/CD pipeline is for infrastructure deployment, either to the cloud or a private data center. Regardless of where your organization builds its infrastructure, IT admins can test the output with PowerShell to ensure that it meets their configuration expectations.
If your organization uses a configuration management tool, then consider this process with PowerShell in the CI/CD pipeline to be complementary. If your organization doesn't use any tools to manage infrastructure configuration, then investigate the benefits of adopting one.
Pester is an open source module to test PowerShell code and infrastructure setups. Typically, with a Pester test, admins store the code as a .ps1 file in their code repository somewhere referenced easily by the worker. For example, we deploy a web server and want to ensure that port 80 and 443 are open. Store the following Pester script in the tests folder:
Describe 'Web Server' {
    Context 'Connectivity' {
        It 'Port 80 should be open' {
            Test-Connection $env:WEB_HOSTNAME -TcpPort 80 | Should -Be $true
        }
        It 'Port 443 should be open' {
            Test-Connection $env:WEB_HOSTNAME -TcpPort 443 | Should -Be $true
        }
    }
}
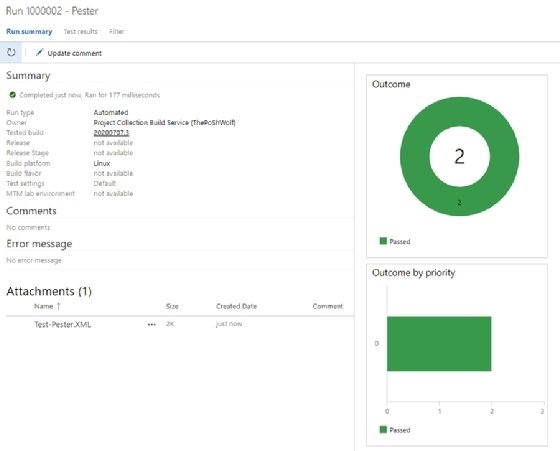
Then, in our pipeline, we add a task to run Pester. This example uses an Azure DevOps pipeline, because there is a marketplace task for Pester testing, and Azure DevOps has a built-in feature to publish and review test results. The yaml file should contain something similar to the following script:
- task: Pester@10
  inputs:
    scriptFolder: '$(System.DefaultWorkingDirectory)/tests'
    resultsFile: '$(System.DefaultWorkingDirectory)/Test-Pester.XML'
    usePSCore: true
- task: PublishTestResults@2
  inputs:
    testResultsFormat: "NUnit"
    testResultsFiles: "$(System.DefaultWorkingDirectory)/Test-Pester.XML"
    failTaskOnFailedTests: true
We also publish our test results via the PublishTestResults@2 task -- that way, we get a report that should look like Figure 1.